Zesty Noodles with Gochujang and Garlic
# Only 15 Minutes and 8 Ingredients Needed for These Extra Tasty Garlicky Spicy Noodles
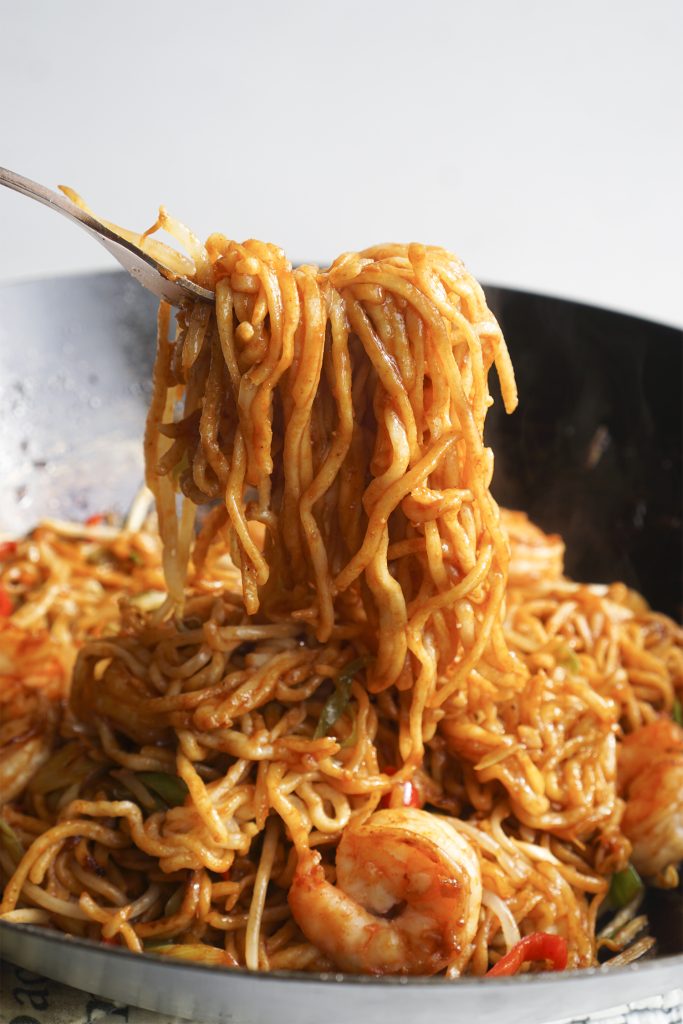
These garlicky spicy noodles are a fast and tasty dish that can be whipped up in just 15 minutes using only eight ingredients. They are rich in sauce, spicy, a tad sweet, and full of umami goodness. Ideal for a quick meal, these noodles are also vegan and nutritious, providing a flexible choice for any event. You can effortlessly incorporate additional protein and vegetables to create a heartier dish.
## Ingredients
1. **Wide Noodles**: Use knife-cut Chinese shanxi planed ribbon noodles or any wide noodles you have on hand.
2. **Neutral Oil**: This is required to sauté the garlic and brown the red pepper flakes.
3. **Garlic**: Six cloves deliver a strong flavor. Modify according to your taste.
4. **Red Pepper Flakes**: One teaspoon supplies the perfect amount of heat; modify to your spice preference.
5. **Soy Sauce**: Contributes umami and saltiness to the meal.
6. **Gochujang**: A Korean spicy condiment that infuses depth and sweetness.
7. **Brown Sugar**: A hint of brown sugar boosts the savory and spicy flavors.
## How to Prepare Spicy Noodles
1. **Cook the Noodles**: Bring a large pot of water to a boil and prepare the noodles as per the package instructions.
2. **Prepare the Sauce**: While the noodles are boiling, heat the oil in a nonstick skillet over medium heat. Add garlic and red pepper flakes, stirring until aromatic. Incorporate soy sauce, gochujang, and brown sugar.
3. **Combine**: Toss the cooked noodles into the skillet and mix until they are shiny and well-coated. If necessary, loosen with a little noodle water.
4. **Serve**: Serve hot and relish your delightful garlicky spicy noodles!
## Customization Choices
These spicy noodles offer extensive customization. You can replace gochujang with your preferred chili sauce, like sriracha or sambal oelek, based on your flavor preferences. Tweak the quantity of red pepper flakes to manage the spiciness.
### Tips for Managing Spice Level
– **Less Spicy**: Decrease the quantity of red pepper flakes or leave out gochujang.
– **More Spicy**: Boost the chili flakes and gochujang. Opt for fresh chili flakes for additional heat.
## What is Gochujang?
Gochujang is a thick, spicy Korean paste crafted from chili powder and sticky rice. It brings a distinctive sweet and spicy flavor to dishes and is typically available in most supermarkets.
## Serving Recommendations
These noodles complement a range of proteins and vegetables. Consider adding:
– Tofu
– Stir-fried veggies
– Grilled chicken or shrimp
## Noodle Varieties
You can utilize different types of noodles for this dish, including:
– Instant ramen (without the seasoning packet)
– Thin rice noodles
– Chinese egg noodles
– Udon
– Pasta
## Gluten-Free Alternatives
For gluten-free noodles, wide rice noodles serve as an excellent substitute.
## Cooking Wide Rice Noodles
1. Boil a large pot of water until it bubbles vigorously.
2. Add the noodles and prepare according to the package instructions.
3. Drain and rinse with cold water to avoid sticking.
4. Incorporate immediately into the spicy sauce.
## Conclusion
These garlicky spicy noodles are a speedy, flavorful, and adaptable dish that can easily be tailored to fit your palate. Enjoy playing with various ingredients and spice levels to make this dish uniquely yours!

Le Creuset Quietly Put These âGorgeousâ Dishes, Mugs, Bowls, and More on Sale (Starting at $5!)

And the colors are iconic.
READ MORE…
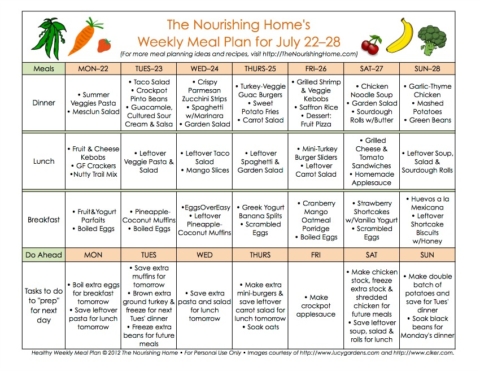
Weekly Meal Schedule for September 22, 2025
### About the Author: Holly Nilsson
Holly Nilsson serves as the imaginative mind behind Spend With Pennies, a site committed to providing simple and comforting recipes tailored for everyday cooking. Fueled by a strong love for nostalgic tastes and straightforward cooking methods, Holly empowers busy home chefs to whip up delightful meals that are both enjoyable and feasible.
Her culinary adventures are showcased in her book, “Everyday Comfort,” which seeks to motivate readers to craft hearty, homemade dishes that bring a sense of warmth and familiarity. Holly’s cooking philosophy highlights practicality and accessibility, enabling everyone to savor the joys of home-cooked meals.
For those keen on delving deeper into Holly’s culinary works, additional articles and recipes can be found on her website.
#### Follow Holly on Social Media:
– [Pinterest](https://www.pinterest.com/spendpennies/)
– [Facebook](https://www.facebook.com/ispendwithpennies/)
– [Twitter](http://spendpennies)
– [Instagram](https://www.instagram.com/spendpennies/)

An All-Inclusive Manual to the 60 Finest Salad Recipes
These tasty salad creations highlight fresh components and bold tastes that are sure to become staples at your dining table, ranging from refreshing green salads to filling grain and bean salads.
Salads are among the most delightful methods to enjoy seasonal, nutrient-rich ingredients! The key? It’s all about layering flavors and textures.
After experimenting with salad recipes throughout the last ten years, I’ve discovered that an excellent salad adheres to several essential guidelines. They require varied textures, such as crisp veggies paired with crunchy nuts, and a flavor balance, ranging from zesty citrus to savory cheese. Here are my top salad suggestions that I’m sure you will adore! They are organized by type:
Green salad recipes
Green salads serve as the cornerstone of my salad collection. These recipes commence with fresh lettuces, kale, or mixed greens, then enhance complexity with toppings.
1. Chopped Salad: This chopped salad has become renowned in my home. The magic occurs with zesty pepperoncini and my homemade Italian dressing that’s vibrant and perfectly balanced, combined with crisp romaine and crunchy vegetables. [Get Recipe](https://www.acouplecooks.com/chopped-salad/)
2. Kale Salad: I’ve presented this massaged kale salad to countless individuals who claimed they “didn’t enjoy kale” and converted every last one. The secret lies in the preparation: I massage the kale leaves with lemon juice and olive oil until they become tender, then incorporate freshly grated Parmesan and a dash of red pepper flakes. [Get Recipe](https://www.acouplecooks.com/kale-salad-recipe/)
3. Caesar Salad: My Caesar salad features a homemade Caesar dressing that’s creamy and garlicky while avoiding heaviness. The mix of crisp romaine, creamy dressing, crunchy croutons, and sharp Parmesan results in the ideal bite each time. [Get Recipe](https://www.acouplecooks.com/caesar-salad/)
4. Easy Arugula Salad: My arugula salad might be the simplest recipe you’ll prepare! There’s no need to make a dressing. Just dress baby arugula with olive oil and lemon juice, then add Parmesan shavings and thinly sliced shallots. Pair it with roasted beets for Arugula Beet Salad. [Get Recipe](https://www.acouplecooks.com/easy-arugula-salad/)
5. Apple Salad: In my family’s preferred apple salad, crisp tart apple slices mingle with pomegranate seeds, creamy goat cheese, and crunchy, cinnamon-spiced pecans. Mix them all together over fresh greens with a zesty maple and apple cider vinegar dressing. Another choice is Apple Walnut Salad. [Get Recipe](https://www.acouplecooks.com/apple-salad/)
6. Mediterranean Salad: This salad showcases crunchy vegetables such as cucumber and onion, salty bursts of feta cheese and Kalamata olives, and handfuls of fresh herbs. Finish it with our Greek Salad Dressing. You can also add chicken, salmon, shrimp, or tofu to turn it into a meal. [Get Recipe](https://www.acouplecooks.com/mediterranean-salad/)
7. Wedge Salad: Classic is classic for a reason, and my favorite traditional wedge salad always satisfies! The crunch of iceberg lettuce paired with the creamy, savory blue cheese dressing is simply perfect. [Get Recipe](https://www.acouplecooks.com/wedge-salad/)
8. Romaine Lettuce Salad: This romaine salad dressed with pale green dressing and delicate pink radishes tastes as delightful as it appears. The Green Goddess dressing elevates it, enveloping everything in herby, savory creaminess. Top with crunchy breadcrumbs for a fun twist on croutons. [Continue Reading](https://www.acouplecooks.com/romaine-lettuce-salad/)
9. Butter Lettuce Salad: I enjoy a good butter lettuce salad, and this one is a favorite. The tender lettuce leaves are irresistible when coated in creamy, savory Parmesan Peppercorn dressing and garnished with a few simple veggies and Parmesan shavings. [Get Recipe](https://www.acouplecooks.com/butter-lettuce-salad/)
10. Italian Salad: This Italian salad bursts with all the right flavors and textures: crisp lettuce, crunchy garlic croutons, and zesty pepperoncini. It’s drizzled with a bold, herby Italian vinaigrette that makes the flavors dance! It pairs wonderfully with just about anything. [Get Recipe](https://www.acouplecooks.com/italian-salad/)
11. Easy Mexican Salad: [Get Recipe](https://www.acouplecooks.com/easy-mexican-salad/)
12. Endive Salad: Try this endive salad: an equal mix of refreshing, tangy, bitter, crunchy, and tangy! Bitter endive pairs beautifully with juicy orange and a sweet-tart red wine vinaigrette. Top it off with savory
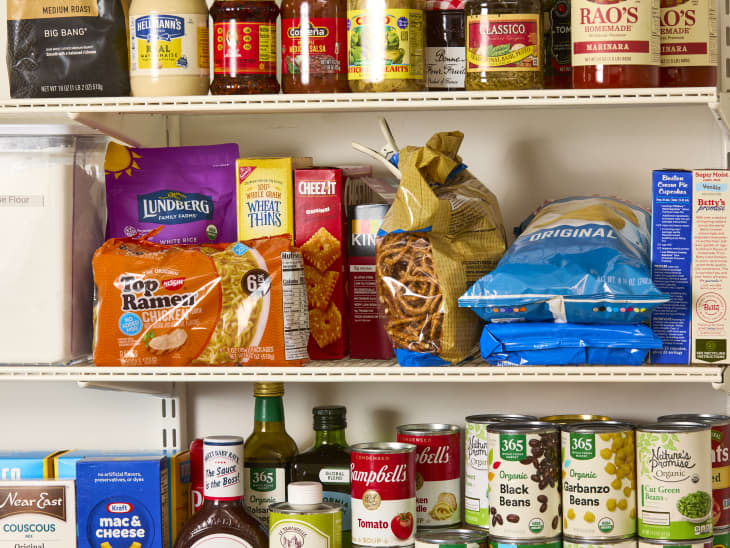
The $18 Cleaning Gem That Will Get Rid of the Moths in Your Pantry (Itâs a Bestseller!)

Shoppers bought more than 9,000 in the past month alone.
READ MORE…

Zesty Noodles with Gochujang and Garlic
# Only 15 Minutes and 8 Ingredients Needed for These Extra Tasty Garlicky Spicy Noodles
These garlicky spicy noodles are a fast and tasty dish that can be whipped up in just 15 minutes using only eight ingredients. They are rich in sauce, spicy, a tad sweet, and full of umami goodness. Ideal for a quick meal, these noodles are also vegan and nutritious, providing a flexible choice for any event. You can effortlessly incorporate additional protein and vegetables to create a heartier dish.
## Ingredients
1. **Wide Noodles**: Use knife-cut Chinese shanxi planed ribbon noodles or any wide noodles you have on hand.
2. **Neutral Oil**: This is required to sauté the garlic and brown the red pepper flakes.
3. **Garlic**: Six cloves deliver a strong flavor. Modify according to your taste.
4. **Red Pepper Flakes**: One teaspoon supplies the perfect amount of heat; modify to your spice preference.
5. **Soy Sauce**: Contributes umami and saltiness to the meal.
6. **Gochujang**: A Korean spicy condiment that infuses depth and sweetness.
7. **Brown Sugar**: A hint of brown sugar boosts the savory and spicy flavors.
## How to Prepare Spicy Noodles
1. **Cook the Noodles**: Bring a large pot of water to a boil and prepare the noodles as per the package instructions.
2. **Prepare the Sauce**: While the noodles are boiling, heat the oil in a nonstick skillet over medium heat. Add garlic and red pepper flakes, stirring until aromatic. Incorporate soy sauce, gochujang, and brown sugar.
3. **Combine**: Toss the cooked noodles into the skillet and mix until they are shiny and well-coated. If necessary, loosen with a little noodle water.
4. **Serve**: Serve hot and relish your delightful garlicky spicy noodles!
## Customization Choices
These spicy noodles offer extensive customization. You can replace gochujang with your preferred chili sauce, like sriracha or sambal oelek, based on your flavor preferences. Tweak the quantity of red pepper flakes to manage the spiciness.
### Tips for Managing Spice Level
– **Less Spicy**: Decrease the quantity of red pepper flakes or leave out gochujang.
– **More Spicy**: Boost the chili flakes and gochujang. Opt for fresh chili flakes for additional heat.
## What is Gochujang?
Gochujang is a thick, spicy Korean paste crafted from chili powder and sticky rice. It brings a distinctive sweet and spicy flavor to dishes and is typically available in most supermarkets.
## Serving Recommendations
These noodles complement a range of proteins and vegetables. Consider adding:
– Tofu
– Stir-fried veggies
– Grilled chicken or shrimp
## Noodle Varieties
You can utilize different types of noodles for this dish, including:
– Instant ramen (without the seasoning packet)
– Thin rice noodles
– Chinese egg noodles
– Udon
– Pasta
## Gluten-Free Alternatives
For gluten-free noodles, wide rice noodles serve as an excellent substitute.
## Cooking Wide Rice Noodles
1. Boil a large pot of water until it bubbles vigorously.
2. Add the noodles and prepare according to the package instructions.
3. Drain and rinse with cold water to avoid sticking.
4. Incorporate immediately into the spicy sauce.
## Conclusion
These garlicky spicy noodles are a speedy, flavorful, and adaptable dish that can easily be tailored to fit your palate. Enjoy playing with various ingredients and spice levels to make this dish uniquely yours!
Read More
Le Creuset Quietly Put These âGorgeousâ Dishes, Mugs, Bowls, and More on Sale (Starting at $5!)
And the colors are iconic.
READ MORE…

Weekly Meal Schedule for September 22, 2025
### About the Author: Holly Nilsson
Holly Nilsson serves as the imaginative mind behind Spend With Pennies, a site committed to providing simple and comforting recipes tailored for everyday cooking. Fueled by a strong love for nostalgic tastes and straightforward cooking methods, Holly empowers busy home chefs to whip up delightful meals that are both enjoyable and feasible.
Her culinary adventures are showcased in her book, “Everyday Comfort,” which seeks to motivate readers to craft hearty, homemade dishes that bring a sense of warmth and familiarity. Holly’s cooking philosophy highlights practicality and accessibility, enabling everyone to savor the joys of home-cooked meals.
For those keen on delving deeper into Holly’s culinary works, additional articles and recipes can be found on her website.
#### Follow Holly on Social Media:
– [Pinterest](https://www.pinterest.com/spendpennies/)
– [Facebook](https://www.facebook.com/ispendwithpennies/)
– [Twitter](http://spendpennies)
– [Instagram](https://www.instagram.com/spendpennies/)

An All-Inclusive Manual to the 60 Finest Salad Recipes
These tasty salad creations highlight fresh components and bold tastes that are sure to become staples at your dining table, ranging from refreshing green salads to filling grain and bean salads.
Salads are among the most delightful methods to enjoy seasonal, nutrient-rich ingredients! The key? It’s all about layering flavors and textures.
After experimenting with salad recipes throughout the last ten years, I’ve discovered that an excellent salad adheres to several essential guidelines. They require varied textures, such as crisp veggies paired with crunchy nuts, and a flavor balance, ranging from zesty citrus to savory cheese. Here are my top salad suggestions that I’m sure you will adore! They are organized by type:
Green salad recipes
Green salads serve as the cornerstone of my salad collection. These recipes commence with fresh lettuces, kale, or mixed greens, then enhance complexity with toppings.
1. Chopped Salad: This chopped salad has become renowned in my home. The magic occurs with zesty pepperoncini and my homemade Italian dressing that’s vibrant and perfectly balanced, combined with crisp romaine and crunchy vegetables. [Get Recipe](https://www.acouplecooks.com/chopped-salad/)
2. Kale Salad: I’ve presented this massaged kale salad to countless individuals who claimed they “didn’t enjoy kale” and converted every last one. The secret lies in the preparation: I massage the kale leaves with lemon juice and olive oil until they become tender, then incorporate freshly grated Parmesan and a dash of red pepper flakes. [Get Recipe](https://www.acouplecooks.com/kale-salad-recipe/)
3. Caesar Salad: My Caesar salad features a homemade Caesar dressing that’s creamy and garlicky while avoiding heaviness. The mix of crisp romaine, creamy dressing, crunchy croutons, and sharp Parmesan results in the ideal bite each time. [Get Recipe](https://www.acouplecooks.com/caesar-salad/)
4. Easy Arugula Salad: My arugula salad might be the simplest recipe you’ll prepare! There’s no need to make a dressing. Just dress baby arugula with olive oil and lemon juice, then add Parmesan shavings and thinly sliced shallots. Pair it with roasted beets for Arugula Beet Salad. [Get Recipe](https://www.acouplecooks.com/easy-arugula-salad/)
5. Apple Salad: In my family’s preferred apple salad, crisp tart apple slices mingle with pomegranate seeds, creamy goat cheese, and crunchy, cinnamon-spiced pecans. Mix them all together over fresh greens with a zesty maple and apple cider vinegar dressing. Another choice is Apple Walnut Salad. [Get Recipe](https://www.acouplecooks.com/apple-salad/)
6. Mediterranean Salad: This salad showcases crunchy vegetables such as cucumber and onion, salty bursts of feta cheese and Kalamata olives, and handfuls of fresh herbs. Finish it with our Greek Salad Dressing. You can also add chicken, salmon, shrimp, or tofu to turn it into a meal. [Get Recipe](https://www.acouplecooks.com/mediterranean-salad/)
7. Wedge Salad: Classic is classic for a reason, and my favorite traditional wedge salad always satisfies! The crunch of iceberg lettuce paired with the creamy, savory blue cheese dressing is simply perfect. [Get Recipe](https://www.acouplecooks.com/wedge-salad/)
8. Romaine Lettuce Salad: This romaine salad dressed with pale green dressing and delicate pink radishes tastes as delightful as it appears. The Green Goddess dressing elevates it, enveloping everything in herby, savory creaminess. Top with crunchy breadcrumbs for a fun twist on croutons. [Continue Reading](https://www.acouplecooks.com/romaine-lettuce-salad/)
9. Butter Lettuce Salad: I enjoy a good butter lettuce salad, and this one is a favorite. The tender lettuce leaves are irresistible when coated in creamy, savory Parmesan Peppercorn dressing and garnished with a few simple veggies and Parmesan shavings. [Get Recipe](https://www.acouplecooks.com/butter-lettuce-salad/)
10. Italian Salad: This Italian salad bursts with all the right flavors and textures: crisp lettuce, crunchy garlic croutons, and zesty pepperoncini. It’s drizzled with a bold, herby Italian vinaigrette that makes the flavors dance! It pairs wonderfully with just about anything. [Get Recipe](https://www.acouplecooks.com/italian-salad/)
11. Easy Mexican Salad: [Get Recipe](https://www.acouplecooks.com/easy-mexican-salad/)
12. Endive Salad: Try this endive salad: an equal mix of refreshing, tangy, bitter, crunchy, and tangy! Bitter endive pairs beautifully with juicy orange and a sweet-tart red wine vinaigrette. Top it off with savory
Read More
The $18 Cleaning Gem That Will Get Rid of the Moths in Your Pantry (Itâs a Bestseller!)
Shoppers bought more than 9,000 in the past month alone.
READ MORE…

How to Make Chicken Parmesan from Scratch in Under One Hour
### About the Author: Holly Nilsson
Holly Nilsson is the visionary behind Spend With Pennies, a website committed to delivering simple and comforting recipes tailored for everyday cooking. With a profound love for nostalgic tastes and uncomplicated cooking methods, Holly enables busy home chefs to create tasty meals that are both fulfilling and dependable.
Her culinary adventure is captured in her book, “Everyday Comfort,” which seeks to motivate readers with wholesome, home-cooked dishes that bring a sense of warmth and familiarity. Holly’s cooking philosophy prioritizes accessibility, allowing anyone to whip up delightful meals without the anxiety often linked to cooking.
For those interested in delving deeper into Holly’s culinary creations and perspectives, you can discover her articles on her website.
#### Follow Holly on Social Media:
– [Pinterest](https://www.pinterest.com/spendpennies/)
– [Facebook](https://www.facebook.com/ispendwithpennies/)
– [Twitter](http://spendpennies)
– [Instagram](https://www.instagram.com/spendpennies/)
Holly Nilsson keeps inspiring home cooks all around with her easy-to-follow recipes and passion for comforting cuisine.
Read More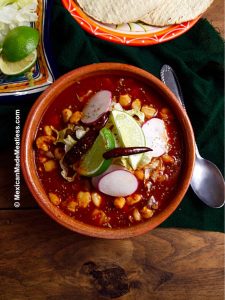
Fast and Simple Instant Pot Pozole Rojo Recipe
# Simple and Quick Instant Pot Pozole Rojo Recipe
Pozole Rojo is a classic Mexican soup, abundant in flavor and tradition. Typically prepared with pork, hominy, and a mix of spices and chilies, this dish culminates in a rich red broth. Utilizing an Instant Pot can greatly lessen the cooking duration while preserving the genuine taste. Here’s a straightforward and quick recipe to savor this traditional dish at home.
## Ingredients
– 2 lbs pork shoulder, chopped into pieces
– 1 large onion, diced
– 4 cloves garlic, chopped
– 2 tablespoons vegetable oil
– 1 tablespoon ground cumin
– 1 tablespoon dried oregano
– 2 teaspoons salt
– 1 teaspoon black pepper
– 2 bay leaves
– 4 cups chicken broth
– 2 cups water
– 1 (25 oz) can of hominy, drained and rinsed
– 3 dried guajillo chilies, stems removed and seeded
– 3 dried ancho chilies, stems removed and seeded
– 1 tablespoon apple cider vinegar
## Garnishes (optional)
– Shredded cabbage
– Sliced radishes
– Diced avocado
– Chopped cilantro
– Lime wedges
– Tortilla chips
## Instructions
### Step 1: Prepare the Chilies
1. Place the guajillo and ancho chilies in a bowl, covering them with hot water. Allow them to soak for approximately 15 minutes until softened.
2. Drain the chilies and put them in a blender. Add 1 cup of chicken broth and blend until smooth. Set aside.
### Step 2: Sauté the Ingredients
1. Switch the Instant Pot to the ‘Sauté’ mode and add vegetable oil.
2. Add the diced onion and chopped garlic, sautéing until the onion turns translucent.
3. Incorporate the pork pieces into the pot, browning them on all sides.
### Step 3: Add Seasonings and Broth
1. Mix in the cumin, oregano, salt, and black pepper.
2. Pour the blended chili mixture, along with the remaining chicken broth and water.
3. Include the bay leaves and apple cider vinegar. Stir thoroughly to combine.
### Step 4: Pressure Cook
1. Close the lid on the Instant Pot and select ‘Manual’ or ‘Pressure Cook’ on high for 30 minutes.
2. After the cooking time finishes, allow the pressure to release naturally for about 10 minutes, then conduct a quick release for any remaining pressure.
### Step 5: Add Hominy
1. Carefully take off the lid and mix in the drained hominy into the pot.
2. Return the Instant Pot to ‘Sauté’ mode and let the pozole simmer for another 5-10 minutes to warm the hominy completely.
### Step 6: Serve
1. Remove the bay leaves prior to serving.
2. Serve the pozole into bowls and garnish with your choice of shredded cabbage, sliced radishes, diced avocado, chopped cilantro, lime wedges, and tortilla chips.
## Tips for the Ideal Pozole Rojo
– **Chili Selection**: The guajillo and ancho chilies lend the distinctive red hue and rich flavor. Modify the quantity of chilies based on your heat tolerance.
– **Pork Alternatives**: While pork shoulder is the traditional choice, chicken thighs can be used for a lighter version.
– **Make Ahead**: Pozole often benefits from being made a day in advance as the flavors meld. Consider preparing it a day ahead and reheating it before serving.
Indulge in this robust and flavorful Instant Pot Pozole Rojo, a comforting dish suitable for any gathering.
Read More


Anthropologieâs Halloween Collection Is So âStunning,â Even Morticia Addams Would Approve

Number 3 is a need.
READ MORE…

10 Kitchen Items That âStill Work Like a Dreamâ After Using Them Every Day for Decades, According to Home Cooks

Some even come from their great-great-grandmothers.
READ MORE…